The main interior feature of any car would be the centre console. Lucky for us the BMW Z3 centre console is highly customizable with lots of options to choose from from the factory and it is easy to get too and only consists of 6 major parts which can be personalized once you get the whole console out of the car. In the description below I provide links to the parts mentioned, and when not available new I refer to ebay for used parts. Remember the Z3 is 20+ years old and original parts would be harder to source, so check week on week if the part you are searching for is not listed.
1. The Skeleton
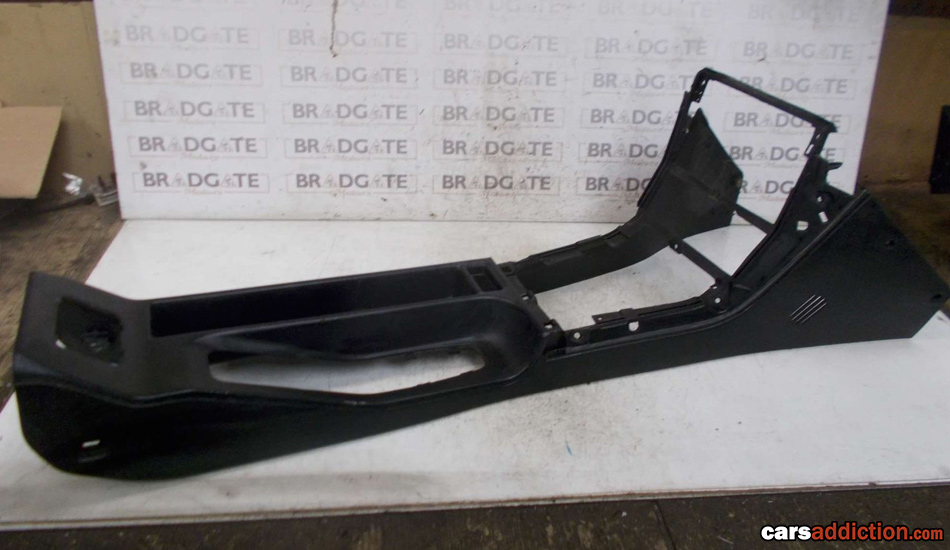
Technically this is the same for all BMW Z3s, whether its a prefacelift, faclift or Z3M. This is good news if you ever need to replace a part or repair your own. One note to remember is that there is a plastic horizontal bar that differs slightly between models that can be removed if upgrading to a Z3M center console panels and keeping the a non M bare console.
2. The Boomerangs Hockey Sticks side trim
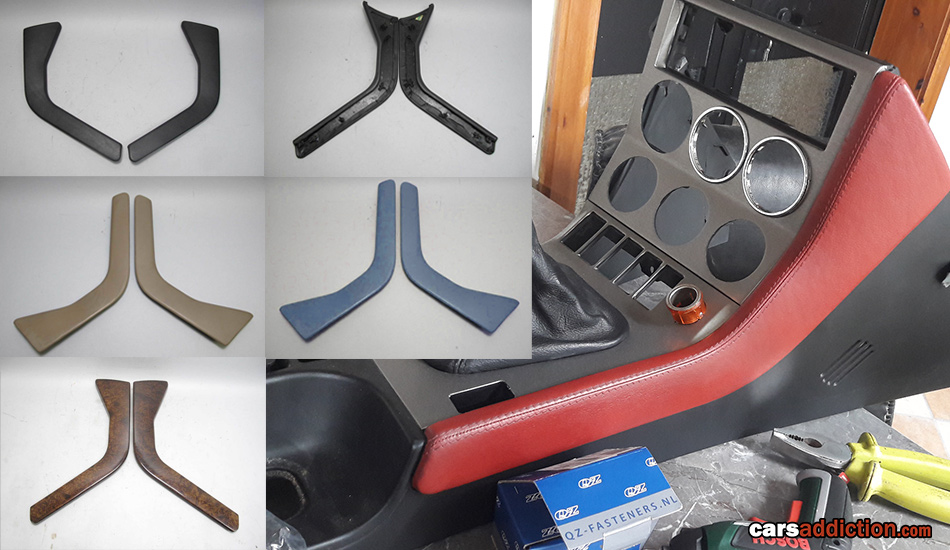
Also referred to as the knee side pad trim, centre console sides trims ... these can come in the basic black plastic or in leather with a variety of colors: beige, black, tanin red, blue, impala brown or wood finish and are interchangeable with any BMW Z3.
The color of my Z3 is Hellrot, so I decided to treat her to a red side trims to add a bit of color to the interior.
3. Centre Fascia
This is where it gets interesting, supplied from the factory the most common finish would be a basic black, sometimes found in red or blue, others with a variety of wood finishes and some with a tailored individual finish directly from BMW. If you are finding your particular console a bit dull, my suggestion is to get it professionally wrapped in your favourite finish with a proper vinyl. Not only it is a cheaper option but it is less time consuming trying to hunt down a used OEM centre console in your favorite color and its more resistant to scratches. A small roll of 1ftx5ft (30cmx152cm) is enough to cover both panels and some popular color options are:
I personally went down this route in brushed aluminum and went beyond and got the following parts wrapped. The best part of this is after a few years I can have them redone in a different color :)
- Both panels of the centre console
- Upper door lining on door card
- Corners of the steering wheel
- The plastic rear seat protectors
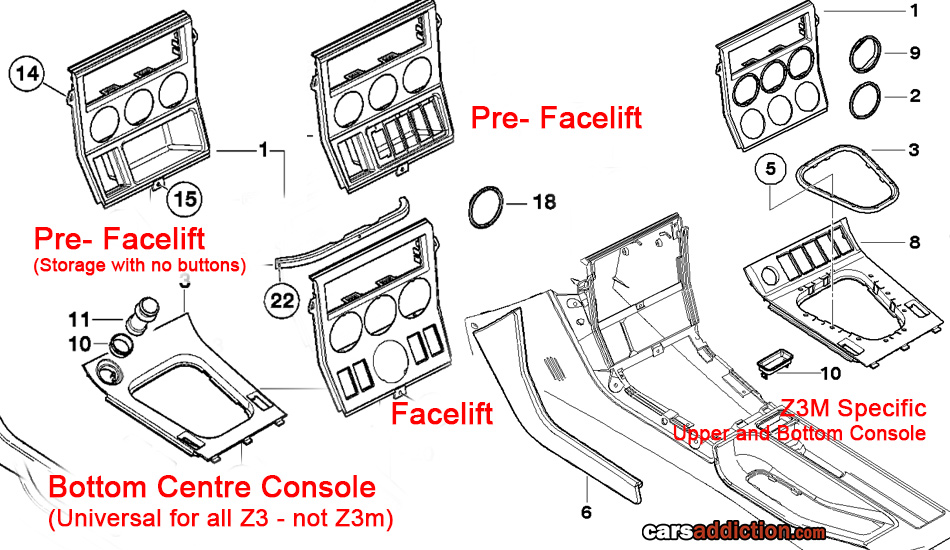
Main Centre Console
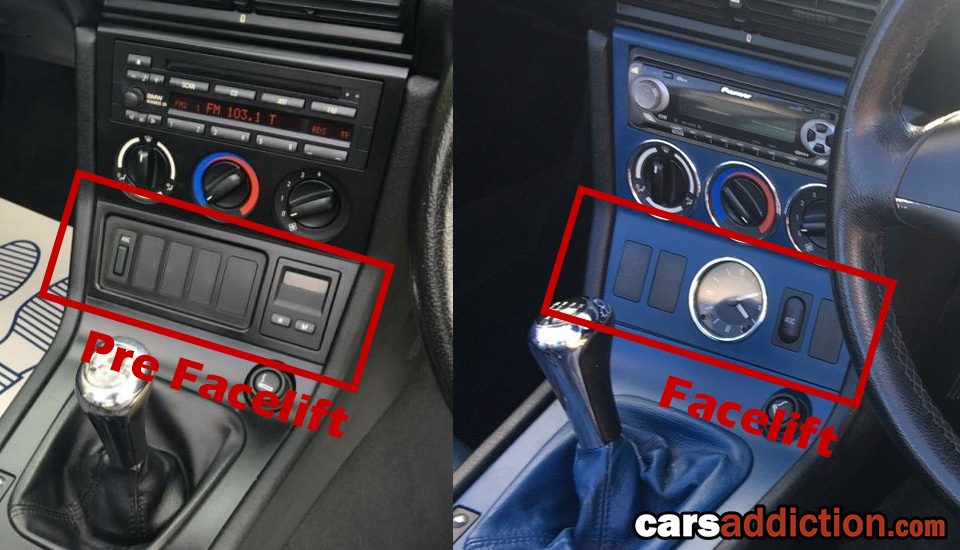
Centre consoles for LHD and RHD vehicles differ, refer to the location of the emergency brake and cigarette light for the difference. The middle panels of the centre console is divided in 2 parts, the upper part that accommodates the radio and heater controls, the bottom part surrounds the the gear lever. The bottom part is interchangeable between facelift and prefacelift models BUT is dependent on were your steering is located. There is a second style bottom part of the console made just for Z3M to accommodate the buttons to make room for the additional gauges.

There are 3 different upper center console layouts for the BMW Z3. One accommodates the square clock (pre facelift), another with the circular clock (facelift) and lastly an unique one with 6 holes for any year of the BMW Z3M.
Note: The bottom part of the BMW Z3M console is prone to breaking near the button slots. BMW overlooked this and made the supporting areas to thin.
Can I swap for a BMW Z3M Center console?
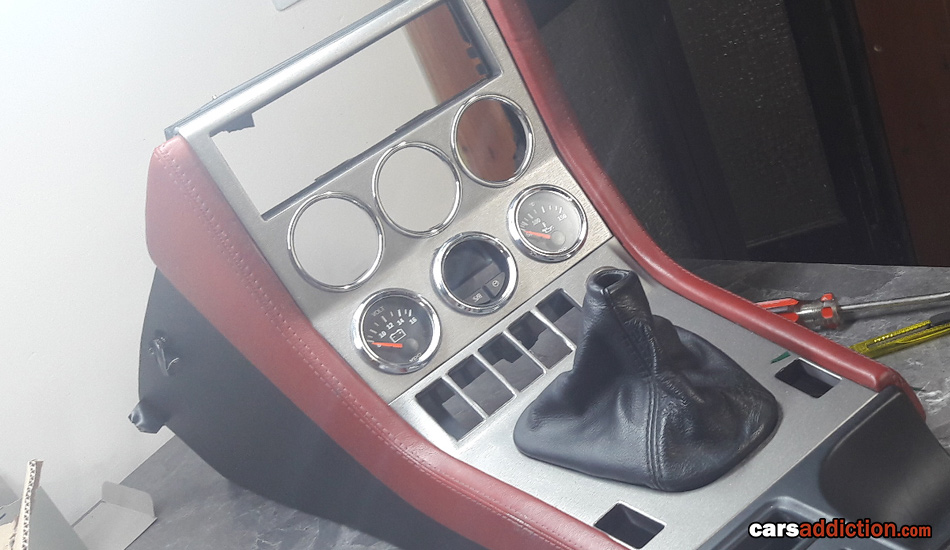
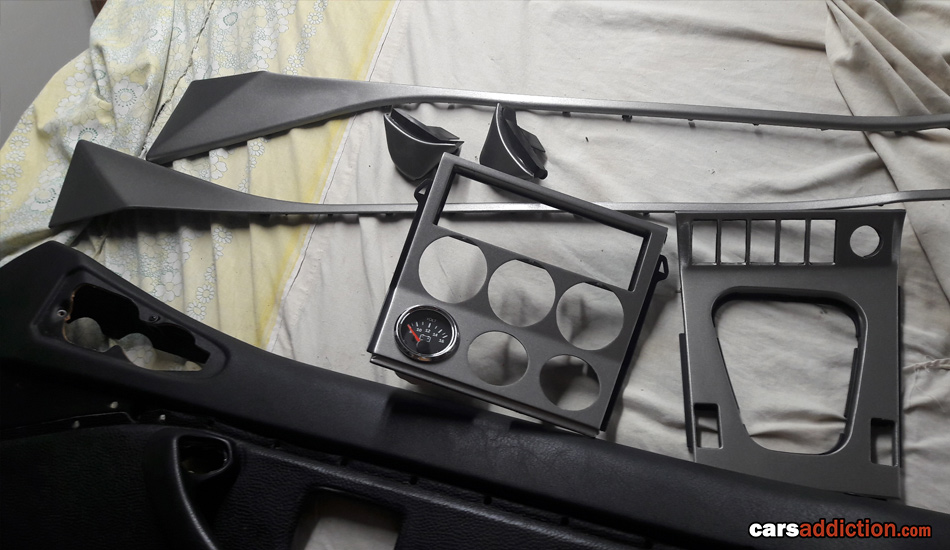
Yes you can and the process is literally plug and play if you buy the whole centre Z3M console into your non M Z3. However finding a whole console can be proven to be expensive and hard to ship and not always easy to find, but if you are not in a rush you could start collecting the below parts to build yourself the ultimate console. Please note you might need to add some custom wiring depending on the gauges you pick. Here is the shopping list:
- BMW Z3M Upper Center console
- BMW Z3M Bottom Center Console
- BMW Z3M gaiter*
- BMW Z3M chrome gaiter surround (this is very hard part to find and I personally don't like it so I filled the holes, and had a custom wrap applied on top of it)
- 3 x 52mm gauges**, any universal gauge will fit but I highly recommend the VDO units for that OEM finish. You can also hunt down some original items, although rare and pricey I list all the part numbers here.
- Optional: Facelift switches (only needed if you are upgrading from a pre facelift)
*The gaiter (leather part beneath the gear stick) for non-M and M cars are different. This part is not so common to come by and is expensive. I would recommend to save some money and keep your non-M gaiter by cutting the plastic ring at the bottom to allow it to take the new shape and rejoin it accordingly. This is what I have done and you wouldn't notice that it is not the original part.
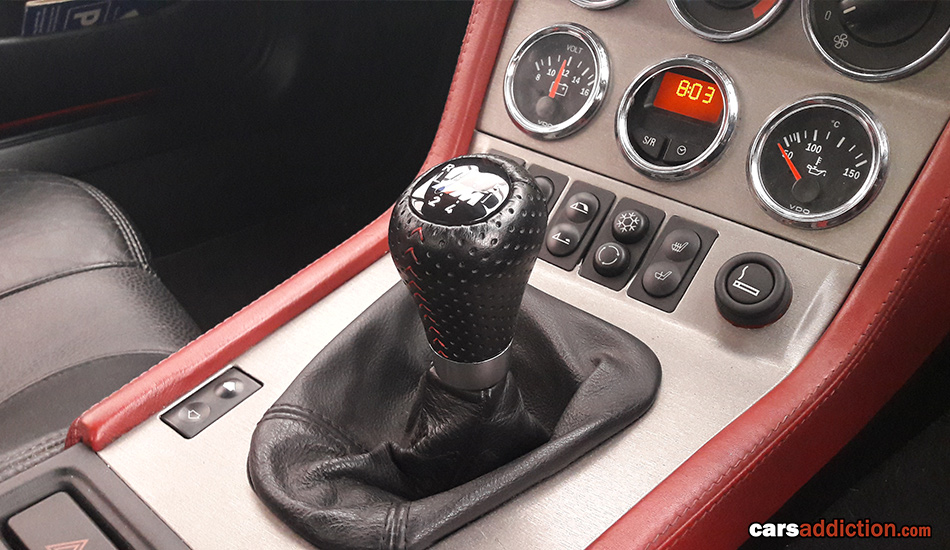
** The choice of gauges I selected for my Z3 were the Voltmeter, Oil temperature and a facelift OBC for a one-off custom fitment. A voltmeter was priority since my car is not a daily driver and the battery tends to go flat when stored for long stretches of time and this way I would have a clear indicator when the battery would need a charge.

Note: The OBC for the Z3m Center Console was never an option. I personally like the idea of the OBC, so I wanted to retrofit it into the console. This also is a space saver since it technically provides five gauges (Clock, outside temperature, mpg, average speed, fuel range) in the space of one. I have also bought an extra VDO chrome ring to compliment the rest of the gauges. Also note that I needed to purchase 2 separate VDO screw rings to secure the gauges in place, since VDO sells them separately to the gauges.
4. Clocks and Gauges
There are a total of 5 different clocks, some are analog and others digital for the BMW Z3.
Prefacelift
Two boxy ones for the prefacelift dash, both are digital with a difference that one of them is an
On Board Computer (OBC) with the ability to tell you time, outside temperature and mpg. The bonus with pre-facelift clocks is that they are interchangeable with the BMW 3series (E36) of the time.
Facelift
Two circular ones for the facelift BMW Z3 dash, one is analog with white dials and the other is the digital On Board Computer (OBC) with the ability to tell you time, outside temperature, mpg, fuel range and average road speed.
Z3M only
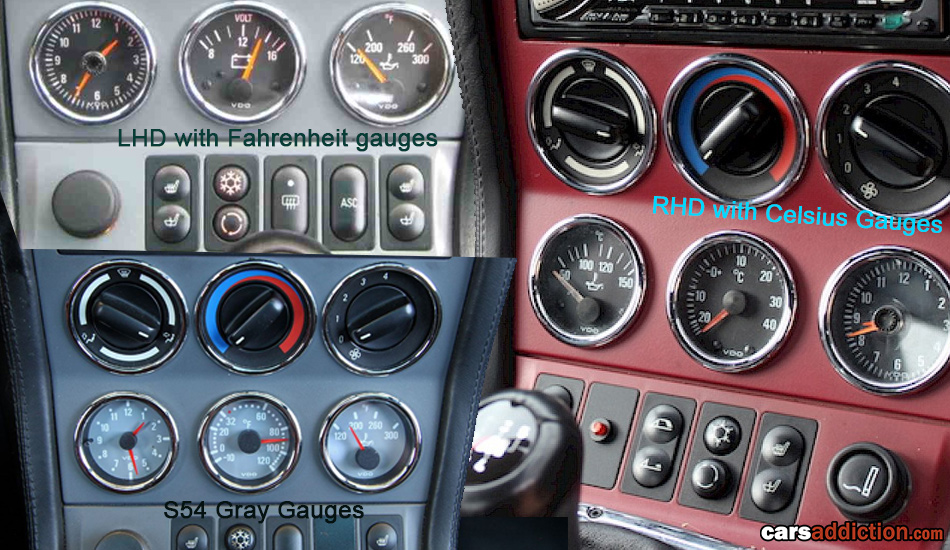
The BMW Z3M has only one style of the clock and that would be the 52mm analog clock with a chrome ring and red dials. In addition, this model was the only Z3 to feature 2 additional gauges with one of the following: outside temperature, oil temperature or voltage. Luckily BMW used universal 52mm gauges made by VDO, so if the OEM option is expensive or not available you view the vast range of options from VDO to fit in the given slot.
Note: the Z3M equipped with the S54 engine come with gray background gauges, instead of the usual black background ones.
OBC Retrofit
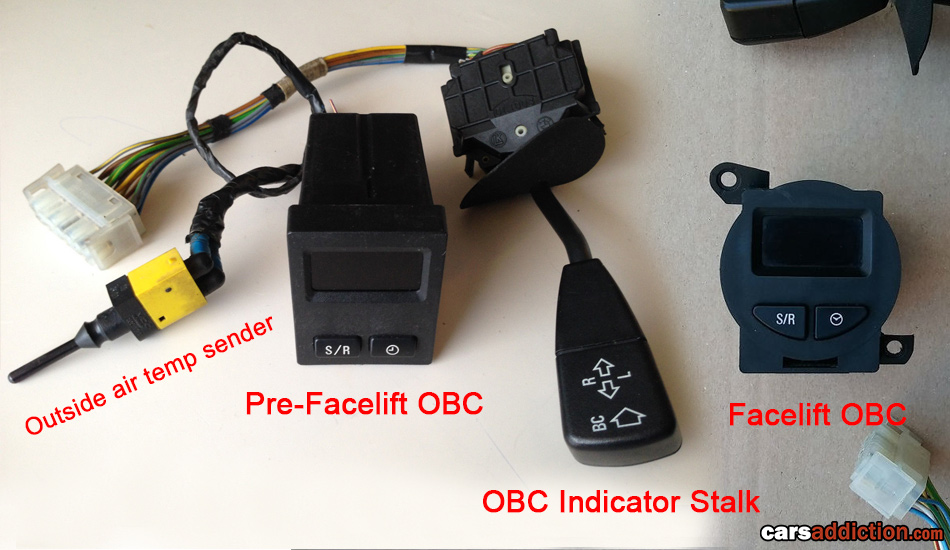
If your car is equipped without the OBC, it's actually straightforward to do the upgrade to OBC with the right parts since all Z3s are prewired for the OBC. I will not go through the process in depth but will mention the parts that are needed:
- OBC dash unit - please order according to the facelift or pre-facelift console.
- OBC Steering stalk to replace your existing indicator stalk with the extra functionality. (Part number: #61316904793)
- Outside thermometer, plugs into the right-hand side of the bumper opening, and BMW has pre-wired the connector near the washer bottle.
Tip: Don't worry if the OBC in hand displays a different language or units. These can be reprogrammed.
5. Buttons and Switches
The rule of thumb here is the more switches and buttons you have the closer too "full extras" you are. Whether you have an M or non-M BMW Z3, there are 4 to 5 slots which accommodate switches at the front of the console:
- Passenger heated seat switch
- Driver heated seat switch
- Traction control, ASC for cars till 2001 and DSC for 2001 and newer.
- Air condition and recirculating switch
- Power Top
Bonus: At the rear, there are a further 2 slots. One is for the heated rear window for your hard top. The second blank is generally for anything miscellaneous, I personally retrofitted 2 USB slots and an aux input into this slot which connect to my aftermarket head unit and act as a charging point.
PS: I'm assuming by now you already know that thin rectangular buttons are for prefacelift, while the round ones are for the facelift and Z3M models.
6. Gear surround and knob
These can be had in various colors from the factory, however many wanting to personalize their Z3 goto an upholsterer to have their gaiter in a specific color, material and even contrast stitching. It is the same with the gear knob however they are generally interchangeable with any other BMW model. I personally like the weighted short E46 M Sport version with the aluminum trim at the bottom, part number #25117896031. The gear knob can be pulled off, literally by yanking it out vertically, do not twist. In my case, I went for a worn out one on ebay and had it retrimmed in peforated leather with red stitching to introduce the exterior color into the cabin and bought a new top 5 speed decal to revive to old looking one.

Bonus: The handbrake lever can be pulled off in case you would like to goto a wood version, or go to a standard leather one. My advice is to get an old rubber tube of a bicycle wheel to use as grip and protection to the handbrake, and use vise grips around the handbrake and gently rotate and apply pressure between the seats. It is hard but it will eventually give.
How to remove BMW Z3 Centre Console?
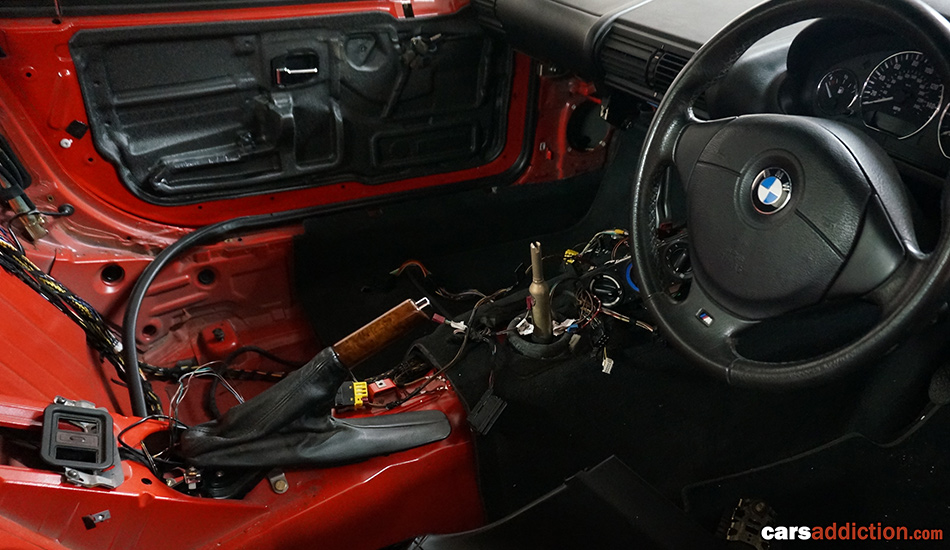
This is thoroughly covered by many others so please do search "BMW Z3 Center Console Replacement" to find the detailed procedure. But in a nutshell it involves:
- Removing both seats, 4 bolts each.
- Removing gear knob by pulling out vertically, please note that no twisting is required.
- Removing various screws along the console and a couple of hidden ones under the ashtray.
- The climate controls stay in place, just slides away.
- Disconnect all switches and radio.
- Slowly lift from the rear and slide it out of the car.

Tip: It is possible to swap the heater control bulbs while the console is still in place, but it's tight and takes the patience of a monk to get it done. So while your console is out, besides the aesthetics part of all things you can also tackle in changing any burnt out lights with ease. Unfortunately, the bulbs are not a standard type and would have to be pre-ordered, by part number #61138353797 which should be available from your local dealer as its a shared part from the E36. Since the cost of 2 bulbs was on the high side I opted for a pack of standard 1.2W 12V T5 type bulbs and had them carefully fitted in place of the old bulbs.
Use code carsaddiction for 20% off!